In this article, I describe my technique for a vaginal approach to right salpingectomy with ovarian preservation, as well as right salpingo-oophorectomy, in a patient lacking a left tube and ovary. This technique is fully illustrated on a cadaver in the Web-based master course in vaginal hysterectomy produced by the AAGL and co-sponsored by the American College of Obstetricians and Gynecologists and the Society of Gynecologic Surgeons. That course is available online at https://www.aagl.org/vaghystwebinar.
For a detailed description of vaginal hysterectomy technique, see the article entitled “Vaginal hysterectomy using basic instrumentation,” by Barbara S. Levy, MD, which appeared in the October 2015 issue of
OBG Management. Next month, in the December 2015 issue of the journal, I will detail my strategies for managing complications associated with vaginal hysterectomy, salpingectomy, and salpingo-oophorectomy.
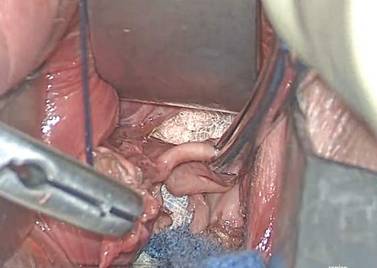
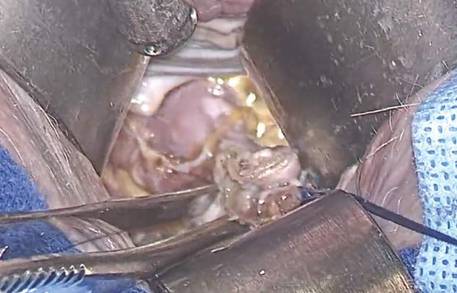
FIGURE 1 Locate the tube
|
The fallopian tube will almost always be found on top of the ovary. |
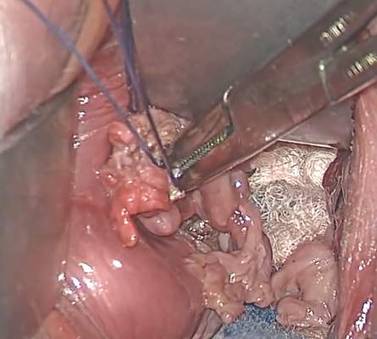
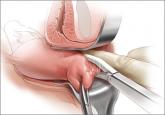
FIGURE 2 Isolate the tube
|
| Grasp the tube and bring it to the midline. |
Begin by placing an instrument on the round ligament, tube, and uterine-ovarian pedicle, exerting light traction. Note that the tube will always be found on top of the ovary
(FIGURE 1). Take care during placement of packing material to avoid sweeping the fimbriae of the tube up and out of the surgical field. You may need to play with the packing a bit until you are able to deliver the tube.
Once you identify the tube, isolate it by bringing it down to the midline
(FIGURE 2). One thing to note if
you’re accustomed to performing bilateral salpingo-oophorectomy: The gonadal pedicle is fairly substantive and can sustain a bit of tugging. However, if you’re performing salpingectomy with ovarian preservation, you need to be much more careful in your handling of the tube because the mesosalpinx is extremely delicate.
After you bring the tube to the midline, grasp it using a Heaney or Shallcross clamp. You could use energy to take this pedicle or clamp and tie it.
Make sure that the packing material is out of the way and that you have most of the tube nicely isolated. Don’t take the tube too far up in the surgical field because, if you lose it, it can be hard to control the bleeding. Ensure that you have grasped the fimbriated end of the tube.
In some cases you can leave a portion of the tube right next to the round ligament (FIGURE 3). You can go back and take that portion later, if you desire. But when it comes to the potential for the fallopian tube to generate carcinoma, most of the concern involves the mid to distal end of the tube rather than the cornual portion.
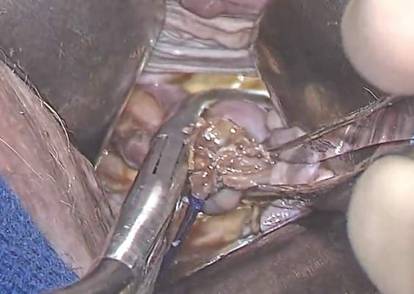
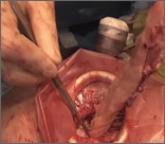
Once the Shallcross clamp has a good purchase on the pedicle, bring the suture around the clamp and then pass it under the tube so that you encircle the mesosalpinx pedicle (FIGURE 4). It is extremely important during salpingectomy to tie this suture down gently but tightly. In the process, have your assistant flash the Shallcross clamp open when you tie the suture. Otherwise, the suture will tend to tear through the mesosalpinx. Be very careful in your handling of the specimen at this point. Next, cut right along the edge of the clamp to remove the tube.
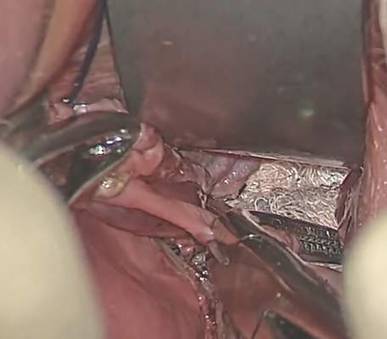
FIGURE 3 Focus on the distal tube
| | FIGURE 4 Clamp and tie the pedicle
|
| The cornual portion of the tube (proximal to the round ligament) can be left behind, if desired. The propensity for cancer centers on the distal end of the tube. | | Bring the suture around the clamp and then pass it under the tube so that you encircle the mesosalpinx pedicle. |
If you prefer, you can stick-tie the remaining portion again, but usually one tie will suffice because there is such a small pedicle there. The distal portion of the pedicle eventually will necrose close to the tie. The next step is ensuring hemostasis.
On occasion, if you lose the pedicle high in the surgical field, you can try to oversew it. A 2-0 Vicryl suture may be used to place a figure-eight stitch to control bleeding around the mesosalpinx. Alternatively, an energy device may be used for hemostasis. Rarely, if you encounter bleeding that does not respond to the previous suggestions, you may need to remove the ovary to control bleeding if the tissue tears.
Transvaginal technique for salpingo-oophorectomy
Once the hysterectomy is completed, grasp the round ligament, tube, and uterine-ovarian pedicle, placing slight tension on the pedicle, and free the right round ligament to ease isolation of the gonadal vessels. Using electrocautery, carefully transect the round ligament. It is critical when isolating the round ligament to transect only the ligament and not to get deep into the underlying tissue or bleeding will ensue. If you “hug” just the round ligament, you will open into the broad ligament and easily be able to isolate the gonadal pedicle.
Once the pedicle is nicely isolated, readjust your retractors or lighting to improve visualization. Now the gonadal vessels can be isolated up high much more easily (FIGURE 1).
Next, use a Heaney clamp to grab the pedicle, making sure that the ovary is medial to the clamp (FIGURE 2).
| | |
FIGURE 1: ISOLATE THE GONADAL VESSELS
Once optimal visualization is achieved, the gonadal vessels can be isolated easily. | | FIGURE 2: KEEP THE OVARY MEDIAL TO THE CLAMP
Use a Heaney clamp to grab the pedicle, keeping the ovary medial to the clamp. |
In this setting, there are a number of techniques you can use to complete the salpingo-oophorectomy. I tend to doubly ligate the pedicle. To begin, cut the tagging suture to get it out of the way. Then place a free tie lateral to the clamp, bringing it down and underneath to fully encircle the pedicle. Ligate the pedicle then cut the free tie. Follow by cutting the pedicle beside the Heaney clamp and removing the specimen. Stick-tie the remaining pedicle.
Locate the free tie, which is easily identified. Place your needle between that free tie and the clamp so that you do not pierce the vessels proximal to the tie with that needle. Then doubly ligate the pedicle.
Check for hemostasis and, once confirmed, cut the pedicle tie. Because this patient does not have a left tube and ovary, the procedure is now completed.