Clinical Review

2015 Update on vaginal hysterectomy
A few innovative tools can greatly ease the operative experience for both surgeon and patient

One nice thing about some vessel sealers is that the surgeon can twist them in any direction. It isn’t necessary to move your hand; you simply move the device itself.
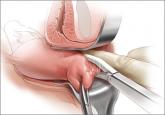
Once you have taken at least the descending branch of the uterine artery, remove the posterior retractor and pull downward on the Jacobs tenaculum. You should have reached just about to the level of the uterine fundus, with the anatomy well visualized (FIGURE 6). Next, open the anterior peritoneum.
Pay attention to the surgical field
Now that you have entered the peritoneum anteriorly as well as posteriorly, identify the broad ligament, keeping in mind that the ureter is retroperitoneal, not intraperitoneal. If you were to place a clamp from the posterior leaf of the broad ligament across to the anterior leaf of the broad ligament, you would be grasping all the vessels but not the ureter. In fact, the anterior Deaver retractor is lifting both ureters up and out of the way. If you pull the cervix off to the opposite side, you create an additional couple of centimeters—a safe space for the vessel sealer (FIGURE 7).
In placing the vessel sealer, there is no need to move out laterally, as there is no need for space to place suture. Instead, hug the uterus. At this point, the main concern is the risk of damaging any small bowel behind the uterine fundus that might be coming down into the surgical field, obscured from vision. And because there may be steam emitted at the tip of the vessel-sealing clamp, keep a finger back there to protect anything that might be in the field.
Last steps
Before taking the last bite of tissue on the right-hand side, place the round ligament in a Heaney clamp. Now that the round and utero-ovarian ligaments have been skeletonized, you can grasp the pedicle in a clamp. If the pedicle is especially thick, it may be beneficial to close the clamp, leave it on for a few seconds, and then reapply it. In that way, you obtain a better purchase.
Next, free the rest of the tissue with a vessel sealer, or cut it. I prefer to use a vessel sealer, and I again protect the adjacent tissue with my fingers anteriorly and posteriorly.
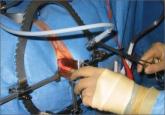
With the clamp remaining on the round ligament and utero-ovarian ligament (FIGURE 8), which will be sutured, push the uterine tissue out of the way, back into the pelvis, to make room for suturing.
Because a postmenopausal vulva may be cut by the suture, it’s important to take pains not to abrade that tissue. Once you have finished suturing the round/utero-ovarian pedicle, leave the needle on the suture so that you can reconnect the round ligament to the anterior pubocervical ring to reconstruct the vaginal apex. For safekeeping, clamp the needle out of the way and tuck it beneath the drape.
Switching to the other side, use a Lahey clamp to flip the uterus, then clamp the pedicle and use the vessel sealer to separate it, again protecting the tissue beneath and ahead of the clamp. Sometimes, with an especially thick pedicle, the vessel sealer will signal that the tissue hasn’t been completely sealed. In that case, get another purchase of the pedicle, protect the adjacent tissue, and seal again.
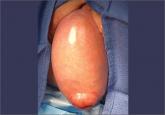
Once the uterus has been removed completely, suture the utero-ovarian and round ligament on this side. One tip to aid in the placement of suture is to move your clamped tissue in such a way as to prevent inadvertent suturing of other tissue (FIGURE 9).
An additional strategy for pain relief at this point is to infiltrate the round ligaments with local anesthetic. We know that we’re working with higher-level fibers—T10 to T12—through the round ligaments. By infiltrating them with anesthetic, you achieve denser pain relief for post- operative management.

A few innovative tools can greatly ease the operative experience for both surgeon and patient

Vaginal hysterectomy is a 21st Century approach, thanks to tools, techniques, and other refinements from the fields of laparoscopy and robotics

Sacrospinous hysteropexy and vaginal hysterectomy with uterosacral ligament suspension were found to be comparable at 12 months after surgery in...
