A The most prominent portion of the prolapsed vaginal vault is grasped with two Allis clamps. B The vaginal wall is opened up and the enterocele sac is identified and entered. C The bowel is packed high into the pelvis using large laparotomy sponges. The retractor lifts the sponges out of the lower pelvis, thus completely exposing the cul-de-sac. When appropriate traction is placed downward on the uterosacral ligaments with an Allis clamp, the uterosacral ligaments are easily palpated bilaterally. D Delayed absorbable sutures have been passed through the uppermost portion of the uterosacral ligaments on each side, and have been individually tagged.
E Each end of the previously passed sutures is brought out through the posterior peritoneum and the posterior vaginal wall. (A free needle is used to pass both ends of these delayed absorbable sutures through the full thickness of the vaginal wall.) F Anterior colporrhaphy is begun by initiating dissection between the prolapsed bladder and the anterior vaginal wall. G Anterior colporrhaphy is complete. H The vagina has been appropriately trimmed and closed with interrupted or continuous delayed absorbable sutures. Delayed absorbable sutures that were previously brought out through the full thickness of the posterior vaginal wall are then tied; doing so elevates the prolapsed vaginal vault high up into the hollow of the sacrum.Once you have entered the peritoneum, the cul-de-sac must be relatively free of adhesive disease if you are to be able to continue with this procedure. (See “5 surgical pearls for high ureterosacral vaginal vault suspension”)
- Be prepared to convert to a sacrospinous fixation if you cannot enter the enterocele sac or if the posterior cul-de-sac is obliterated with adhesions
- Pass the sutures through durable tissue so that, when traction is placed on the sutures, there is minimal movement of peritoneum. Doing so might avoid kinking of the ureter.
- Pass the sutures through the full thickness of the posterior vaginal wall, including the peritoneum. Doing so not only suspends the apex but tremendously facilitates support for the posterior vaginal wall (FIGURE 4).
- When prolapse is very large, excise redundant portions of the upper part of the posterior vaginal wall and peritoneum—making sure, however, that you keep all layers together for performing the suspension. (See VIDEO #4, showing high uterosacral suspension in a patient who has complete uterine procidentia.)
- Do not try to pass a ureteral stent if you do not see indigo carmine dye spill from the ureteral orifices; to do so can be difficult after repair of prolapse, even in the hands of a skilled urologist. It is best instead to:
- identify the offending suture
- cut it
- visualize the spill of dye-colored urine
- proceed with either replacing the cut suture or maintaining the suspension with other, remaining sutures.
In our experience, when we have also performed an anterior repair, the ureter is kinked in at least 50% of cases because of one of the sutures that was used to correct the cystocele.
2. Pack the bowel; expose the uterosacral ligaments
Next, pack the small bowel out of the cul-de-sac to allow easy access and visualization of the uppermost portions of the uterosacral ligament. This is best accomplished by passing large, moistened laparotomy sponges intraperitoneally and elevating them with a large retractor (e.g., Deaver, Breisky-Navrital, Sweetheart).
When the bowel is appropriately packed, the retractor lifts the intestinal contents out of the pelvis, usually allowing easy access to the proximal or uppermost portion of the uterosacral ligaments (see Video #3, which focuses on the anatomy of the uterosacral ligament).

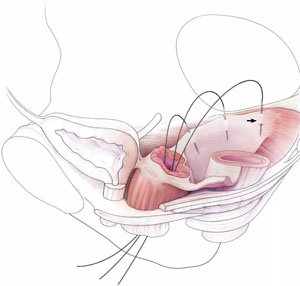
When performing high uterosacral suspension, it is possible to pass sutures through the coccygeus muscle-sacrospinous ligament complex (arrow) because a segment of the uterosacral ligament inserts into that structure.
3. Palpate the ischial spines bilaterally
It’s important that you palpate the ischial spines. Often, the ureter can be palpated against the pelvic sidewall. If you palpate the ischial spines and continue to palpate medially and cephalad, you can usually palpate the coccygeus muscle-sacrospinous ligament complex transperitoneally because a portion of the uterosacral ligament inserts into the sacrospinous ligament.6
If sutures can be passed at this level, the result will (usually) be a vagina that is, at minimum, approximately 9 cm long.

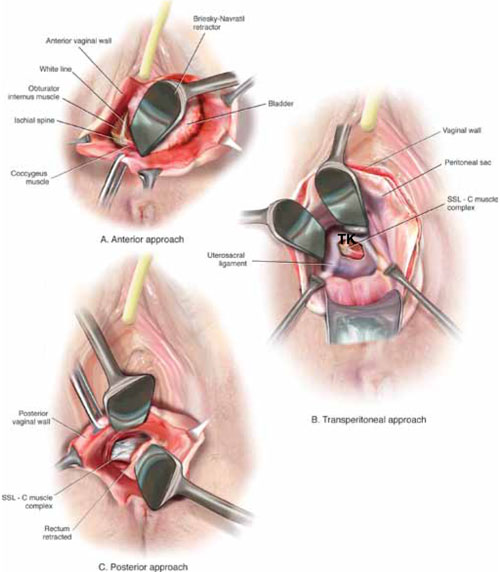
FIGURE 3 Access to the sacrospinous ligament
The sacrospinous ligament can be palpated and exposed along any one of three approaches: anterior paravaginally (A), transperitoneally (B), and posterior pararectally (C).
4. Pass the sutures
We prefer to pass two or three sutures on each side, utilizing a long, straight needle holder. Because we eventually pass the sutures through the full thickness of the posterior vaginal wall, we’ve opted for a delayed absorbable suture—preferably, 0 Vicryl on a CT-2 needle.


