
An accessory 12-mm port, used to introduce sutures and the mesh graft, is placed approximately 10 cm lateral and 4 cm cephalad to the camera in the right-upper quadrant.
An 8-mm robotic port is placed in the right lower quadrant, 10 cm lateral to the accessory port and approximately 3 cm above the anterior superior iliac crest.
The third and fourth robotic arms are placed 10 cm apart in the left lower quadrant, with the fourth arm typically as far lateral as possible.
Docking. After the patient has been placed in steep Trendelenburg position and the table is locked, the robot is docked from the patient’s left side at a 45° angle to the table. Side-docking permits easy access to the vagina to 1) evaluate graft tension and 2) complete cystoscopy to ensure ureteral and bladder integrity.
TIP Take care to ensure that the spine of the robot is positioned right next to the bed at the level of the patient’s hip; driving it up too high in relation to the abdomen can compromise the mobility of the fourth arm. In addition, if the robot is not close enough to the bed, the reach of the first (right) arm may be limited.
Next, introduce monopolar scissors through the right arm; a bipolar PK Dissector (Intuitive Surgical) through the left arm; and an atraumatic bowel grasper, such as Cadiere Forceps (Intuitive Surgical), through the fourth arm.
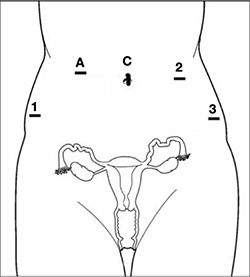
FIGURE 1 Placement of 5 ports for robotic sacrocolpopexy
Key: C, camera; A, accessory port; 1, right arm (monopolar shears); 2, left arm (PK Dissector); 3, fourth arm (Cadiere Forceps).
3. Dissect the sacral promontory and create a retroperitoneal tunnel
With the use of a 0° scope or 30° down-scope, retract the sigmoid colon laterally using Cadiere forceps and identify the right ureter.
TIP When you attempt robotic sacrocolpopexy for the first time, it may help to identify the sacral promontory, using a standard laparoscopic instrument with haptic feedback, before you dock the robot.
Elevate the peritoneum overlying the sacral promontory and open it using monopolar cautery. Expose the fat pad that overlays the anterior longitudinal ligament and gently dissect it away (FIGURE 2; VIDEO 1). Often, the middle sacral artery is visualized; it can be coagulated using the PK Dissector if necessary.
TIP In a case in which the promontory is difficult to find, dissecting the retrorectal space is a simple way to mobilize the bowel away from the sacrum, thus exposing the promontory.
TRICK Instead of opening the peritoneum from the sacrum to the cul-de-sac, I create a retroperitoneal tunnel along that right paracolic gutter, from the promontory to just medial to the right uterosacral ligament (VIDEO 1). Doing so has three benefits:
- It is quicker and less bloody
- It allows the mesh to lay flat in the hollow of the sacrum when you bring the sacral arm up to the promontory
- There is much less peritoneum to close over the mesh at the end of the procedure.
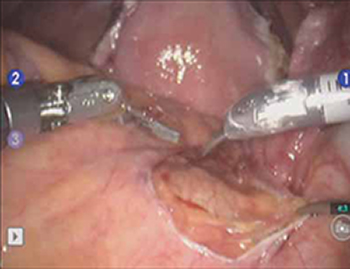
FIGURE 2 Entering the peritoneum
Open the peritoneum at the sacral promontory and dissect the fat pad. This reveals the anterior longitudinal ligament.
4. Dissect the vesicovaginal and rectovaginal spaces
Effective vaginal and rectal manipulation is critical to complete this part of the procedure safely. To gain access to the rectovaginal space, the vaginal assistant needs to push the vagina all the way in and up toward the anterior abdominal wall (the handle of the EEA sizer will be pushing hard up against the perineum) while simultaneously pushing the rectal probe downward (effectively scissoring the two apart).
From the exit point of the retroperitoneal tunnel that was created at the beginning of the case, then extend the peritoneal incision transversely in the shape of a “T” to expose the posterior vaginal wall (FIGURE 3, VIDEO 2). If indicated, dissect the rectovaginal space all the way down to the perineal body.
Deviate the vagina posteriorly to facilitate dissection of the bladder from the anterior vaginal wall. Use sharp dissection with scissors and short bursts of energy with monopolar cautery.
TIP If you encounter significant scarring between the bladder and vagina, retrograde-fill the bladder with 300 mL of saline mixed with methylene blue dye to identify the surgical plane.
Expose approximately 4 to 6 cm of anterior vaginal wall, depending on the degree of anterior vaginal wall prolapse. Try to leave the peritoneum intact at the apex of the vagina to reduce the chance that mesh will erode.
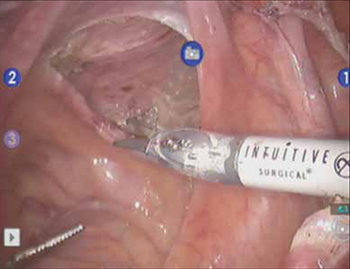
FIGURE 3 The peritoneal incision
Extend the peritoneal incision along the cul-de-sac to the posterior vaginal wall in a T-shaped configuration to gain access the rectovaginal space. When perorming cervicosacropexy, it is easiest to develop this surgical plane before amputating the cervix.