
5. Attach the y-mesh to the vagina
Several mesh options exist: IntePro (American Medical Systems), Alyte (Bard Medical), and Restorelle Y (Mpathy Medical) are preformed Type-1 polypropylene mesh products. A correctly sized mesh can easily be fashioned by suturing together two strips of Gynemesh (Ethicon) that are approximately 3 cm wide.
Because there can be significant variability in the relative dimensions of the anterior and posterior segments of mesh, I recommend fashioning the graft after dissection is complete: When posterior wall prolapse is extensive, for example, preformed y-mesh strips may not be long enough to reach all the way down to the perineal body. After having assessed the differences in graft placement and manipulation when the two arms are sutured together 1) before the grafts are placed intracorporeally and 2) after they are placed, I’ve concluded that the first method—suturing before placement—is far easier.
Introduce the mesh graft through the accessory port after exchanging the scissors and PK dissector for a suture cutter and a large needle driver. Retract the bladder using the fourth arm, and place the anterior mesh arm over the anterior vaginal wall; suture it in place using 2-0 Gore-Tex sutures on CT-2 needles that are each cut to 6 inches long.
For greatest efficiency, anchor the two distal corners first (FIGURE 4; VIDEO 3), then place a series of interrupted stitches towards the vaginal apex. Tie the knots using 2 surgeon’s knots, followed by 2 half-hitches. Attempt to achieve healthy bites through the vaginal muscularis without perforating the epithelium.
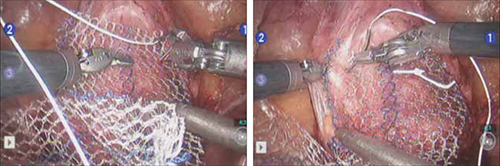
FIGURE 4 Suturing the mesh graft to the vaginal wall
Left and right: Suture the y-shaped polypropylene mesh graft to the anterior vaginal wall first, starting at the distal corners. The bladder is retracted cephalad using the fourth arm.After you’ve adequately secured the anterior mesh arm, deviate the vagina anteriorly and drape the posterior mesh arm over the posterior vaginal wall with the assistance of the fourth robotic arm that can hold upward traction on the sacral end of the mesh graft. Starting at the vaginal apex, place 6 to 8 interrupted sutures to secure the mesh to the posterior vaginal wall (FIGURE 5; VIDEO 4). If necessary, exchange the 0° scope for a 30° up-scope so that you can fully visualize the rectovaginal space.
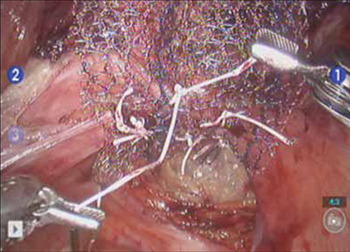
FIGURE 5 Attachment of the posterior arm of the mesh
The fourth arm of the robot provides upward traction on the sacral portion of the mesh graft.
6. Attach the graft to the sacrum
Again retract the sigmoid laterally to expose the promontory dissection. Retrieve the sacral arm of the mesh through the retroperitoneal tunnel and pull it up toward the promontory. Deviate the vagina toward the sacrum and, ensuring that there is no excessive tension, suture the sacral portion of the mesh graft to the anterior longitudinal ligament at the promontory, using 2 or 3 interrupted sutures (FIGURE 6, VIDEO 5).
When placing the needle during this critical juncture, it is important to rotate through the ligament along the curvature of the needle—as opposed to driving the needle forward and risking exiting farther laterally than expected.
TIP Because of the slight traction that exists on the mesh, a slip-knot is preferred instead of a surgeon’s knot when suturing the sacral portion of the mesh graft to the anterior longitudinal ligament. Take care to visualize the middle sacral artery and either suture around it or cauterize it.
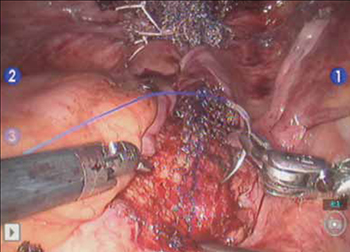
FIGURE 6 Suture the mesh directly to the anterior longitudinal ligament
Use two or three stitches, secured with slip-knots. Take care not to create excessive tension on the mesh graft.
7. Extraperitonealize the mesh
I no longer routinely close the peritoneum over the mesh at the vaginal apex because I have not had a single case of small-bowel obstruction since I began performing this procedure laparoscopically. You should close the peritoneal window at the promontory, however, if the mesh is tented up at all, because tenting creates the potential for bowel to get caught beneath the mesh. Perform this closure using 2-0 monofilament suture or 2-0 Vicryl suture (Ethicon) cut to 8 inches (FIGURE 7). It is always easiest to start distally and suture towards the camera and operative instruments.
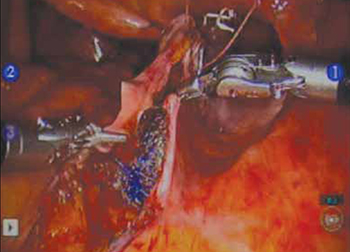
FIGURE 7 Extraperitonealize the mesh
Close the peritoneum from the apex of the vagina with a purse-string—like stitch, continuing it to the promontory in running fashion.
8. Ensure that mesh is not in the bladder or rectum
Perform cystoscopy and a rectal examination at the end of each case to confirm that no sutures or mesh material are within either viscus. It is much easier to remove these before leaving the operating room.