That said, it should be noted that removal of a cerclage with a knot at 6 o’clock is more difficult than removal of one with a knot at 12 o’clock—but the convenience of the operator should be secondary to safety and efficacy of the cerclage.
Place a figure of 8 around the cerclage knot
Because of the proximity of the bladder anteriorly, there is a limit to how high one can place the cerclage anteriorly. However, in the back of the cervix, one can place the cerclage much higher without risk of injury. This approach sometimes will result in downward forces on the posterior part (where the knot is) and occasionally may cover the knot with tissue from the posterior vaginal fornix.
For these reasons, we propose securing the knot of the cerclage tape to the posterior surface of the cervical “core” by placing a figure of 8 using bright blue Prolene #1 (Ethicon) to prevent slippage and help call attention to the knot when the time for removal comes.
1. Use a weighted speculum to retract the posterior-inferior vaginal wall. Have an assistant hold one or two right-angle retractors to retract the other aspects of the vaginal wall, including the bladder anteriorly, as needed.
2. Clamp the anterior and posterior lips of the cervix and tug them lightly—at all times—in an outward direction (FIGURE 2).
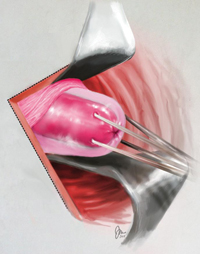
FIGURE 2 Clamping of the cervix
Clamp the anterior and posterior lips of the cervix and tug them lightly and steadily in an outward direction.
3. Retract and release the bladder several times using a right-angle retractor for more accurate identification of the cervico-vesical fold (FIGURE 3 and FIGURE 4). Note the distance from the external os to the cervico-vesical fold; it should be 2 cm or farther. (If it is less than 2 cm, another type of cerclage may be preferable.)
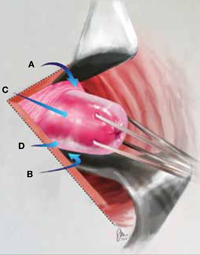
FIGURE 3 Anatomic landmarks
Cerclage is facilitated by orientation to the following landmarks; A. cervico-vesical fold; B. posterior fornix; C. cervical stroma; D. cervical mucosa.
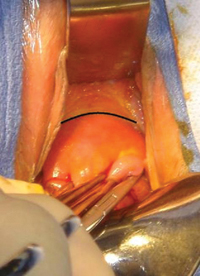
FIGURE 4 Cervico-vesical fold
The black line indicates the location of the fold.
4. Identify the roof of the posterior fornix (FIGURE 3 and FIGURE 5).
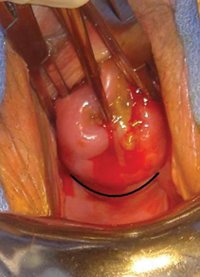
FIGURE 5 Roof of the posterior fornix
This landmark is delineated in black.
5. Using Allis clamps bilaterally, clamp the soft tissue covering the cervical core (stroma), between the cervico-vesical junction anteriorly and the superior point of the posterior fornix posteriorly. This is a cardinal step because it separates the core from the mucosal/ submucosal elements (FIGURE 6). (Helpful hint: To achieve optimal placement of the lateral Allis clamps, place the open clamp ever so slightly to one side of the middle of the cervix. As you close the instrument, let the clamp slide off the cervical core until it is locked adjacent to it. This takes the soft tissue and supporting blood vessels out of the operative field.)

FIGURE 6 Anterolateral view
The pericervical mucosa (black arrow) after application of an Allis clamp.
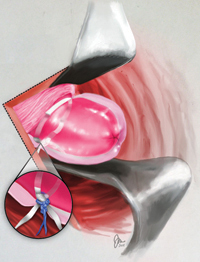
6. Take three bites, 1 mm in depth, through the cervical core using a 5-mm Mersilene tape and a blunt-tipped needle (RS21; Ethicon). One bite should encompass 12:30 to 11:30 anteriorly. Another bite should go in at 3 o’clock and out at 5 o’clock, and another bite should go in at 9 o’clock and out at 7 o’clock (FIGURE 1). (Helpful hint: Ensure that the direction of the pull always is a direct extension of the passage through tissue in small steps and not an outward direction toward the operator. An instrument such as a curved Mayo clamp should be placed at the point of the needle’s exit to reduce the risk of injury. At the conclusion of the three bites, the Mersilene tape should be the same length on each side, exiting at 5 o’clock and 7 o’clock, as stated earlier [FIGURE 7].)
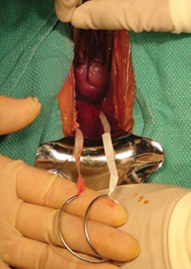
FIGURE 7 Ensure equal distribution of the tape
After taking three bites of tissue, ensure that the ends of the Mersilene tape are of equal length on each side.
7. Once the tape is of equal length on both sides, closely encircling three sides of the cervical core, empty the bladder with a catheter to ensure the presence of clear urine. Bloody urine could be an indication for cystoscopy to rule out bladder injury.
8. Cut the needles off of the tape and tie the cerclage in three ties, the first one being a surgical tie. After tying the first tie, ensure proper tension by pressing gently with the index finger up and down on the knot; if it is properly tensioned, it will not be displaced by this movement. (Helpful hint: There is no clear indication of how tight a cerclage should be tied. We suggest making the first tie as close as possible to the cervical core to create a visible, and palpable, depression in the soft tissue at the area of the knot [FIGURE 8]).