
RELATED ARTICLES
Does vaginal progesterone reduce preterm delivery among asymptomatic women who have a short cervix in the midtrimester?
John T. Repke, MD (Examining the Evidence, April 2012)
Update on obstetrics
John T. Repke, MD, and Jaimey M. Pauli, MD (January 2012)
Placement of a suture around an incompetent cervix to prevent premature pregnancy loss was first described more than 50 years ago1,2—but the few randomized studies that have been published (all of them in the past decade) devote very little attention to technique.3-7
Are we to assume, then, that over more than 50 years, no modifications to technique have been devised?
Are we to assume as well that in the two largest randomized studies to date, which involved 266 cerclages inserted in 27 different medical centers over more than 4 years,5,7 all cerclages were inserted in an identical manner using the same technique originated more than half a century ago?
In this article, we lay out five principles to achieve effective cerclage and describe a stepwise approach to technique. This technique is based on our experience with approximately 2,000 cerclages performed in a single medical center. We emphasize anatomic landmarks and surgical principles that are based on the published literature as well as our personal experience.
Five principles of effective cerclage
Place the cerclage as high as possible
In the original paper on cerclage, McDonald emphasized the need to place the suture as high as possible to be as close as possible to the level of the internal cervical os.2
Zilianti and colleagues elegantly described how—in the absence of cerclage—cervical tissue begins to change at the level of the internal os, forming a funnel that advances downward in the shape of the letters “Y,” “V,” and “U.”8 If we accept this notion, then the only way to prevent further shortening from the top down is by placing a high cerclage.
Studies have demonstrated improved pregnancy outcomes after placement of a high cervico-isthmic cerclage following failure of a “conventional” low cerclage.9,10
Place the cerclage adjacent to the cervical stroma
Macroscopic and microscopic visualization of the cervix reveals the following main layers:
- epithelium/mucosa, which covers the deeper connective tissue known as cervical stroma
- cervical stroma, which may be divided into two zones: 1) a superficial, subepithelial zone that appears histologically as loose stromal bands and 2) a deeper, dense collagen layer.
It is the dense collagen layer of the cervical stroma that affords most of the resistance to forces of deformation, whereas the loose stromal layer and the epithelium above it slide easily over the deeper stroma. Including too great a proportion of these “slippery” components within the cerclage could increase the risk of displacement and failure.11,12
Shirodkar was the first to suggest that the mucosa and submucosa be excluded from cerclage,1 and a detailed submucosal cerclage insertion was described by Fahmy more than 30 years ago.13 We support his recommendation that cerclage placement be as close to the inner cervical stroma as possible and that it include as little as possible of the surrounding tissue.
Take three encircling cervical “bites”
In his original publication, McDonald described “five or six bites with the needle” to encircle the cervix.2 Later authors usually described four encircling steps, but no reliable study has challenged the original dogma.
Although we lack science to favor one approach over another, common sense suggests that three bites (versus four or five) offer the following advantages. They:
- produce less penetrating injury
- require less manipulation of the cervix
- are simpler and quicker to perform
- offer less opportunity for the cerclage tape to get twisted (a flat tape provides for better distribution of the load)
- permit a small gap between the two final exit points of the tape (at 5 o’clock and 7 o’clock), which allows for easier cinching and tightening of the cerclage (FIGURE 1).
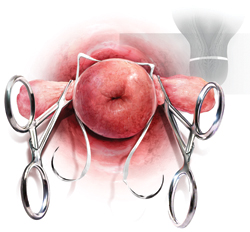
FIGURE 1 A small gap between the ends of the cerclage tape, which exit at 5 o’clock and 7 o’clock, allows for easier cinching and tightening.
Both Shirodkar1 and McDonald2 described placement of the knot (or approximation of the “ends”) at 12 o’clock, anteriorly. However, this approach can complicate removal if strong pressure is applied to the cerclage or if it is covered by tissue. Attempts to remove the cerclage can result in bladder injury.
For these reasons, we prefer the approach described by Caspi and colleagues, who placed the knot in the back of the cervix at 6 o’clock.14 In that location, the surgeon can reach as high as desired, and there is no risk of organ injury during removal.